Hi @Everyone ,
Algo trading sounds intimidating until you actually sit down and build one. In reality, a working momentum algorithm can be written in roughly 50 lines of code, and even a fairly complex, production-ready strategy rarely crosses 100–150 lines. This guide walks you through building a complete, end-to-end momentum options-buying algorithm on the Dhan API — from scanning stocks to placing a fully bracketed order with stop loss and target — exactly the way a professional algo trader would build it.
By the end of this tutorial, you will understand how to:
- Scan a watchlist of NIFTY 50 stocks automatically
- Apply RSI and EMA indicators the same way you would read them manually on a chart
- Detect a bullish momentum condition using the last completed candle
- Auto-select the correct out-of-the-money (OTM) option strike
- Calculate entry, stop loss, and target levels
- Place a fully automated Super Order with trailing stop loss
- Deploy the strategy on a SEBI-compliant static IP so it can run live, unattended
Who this is for: Traders who already understand RSI, EMA, and options basics manually, and want to see exactly how that manual process is translated into automated code.
What This Algo Actually Does
Before touching any code, it helps to define the strategy in plain English — exactly how you’d explain it to another trader:
Scan NIFTY 50 stocks. Wherever RSI and EMA both favor a bullish move, buy a call option. Set a stop loss and target. Do the same logic for the sell side.
That’s it. The entire algo is a direct translation of this sentence into code. Nothing more exotic is happening under the hood.
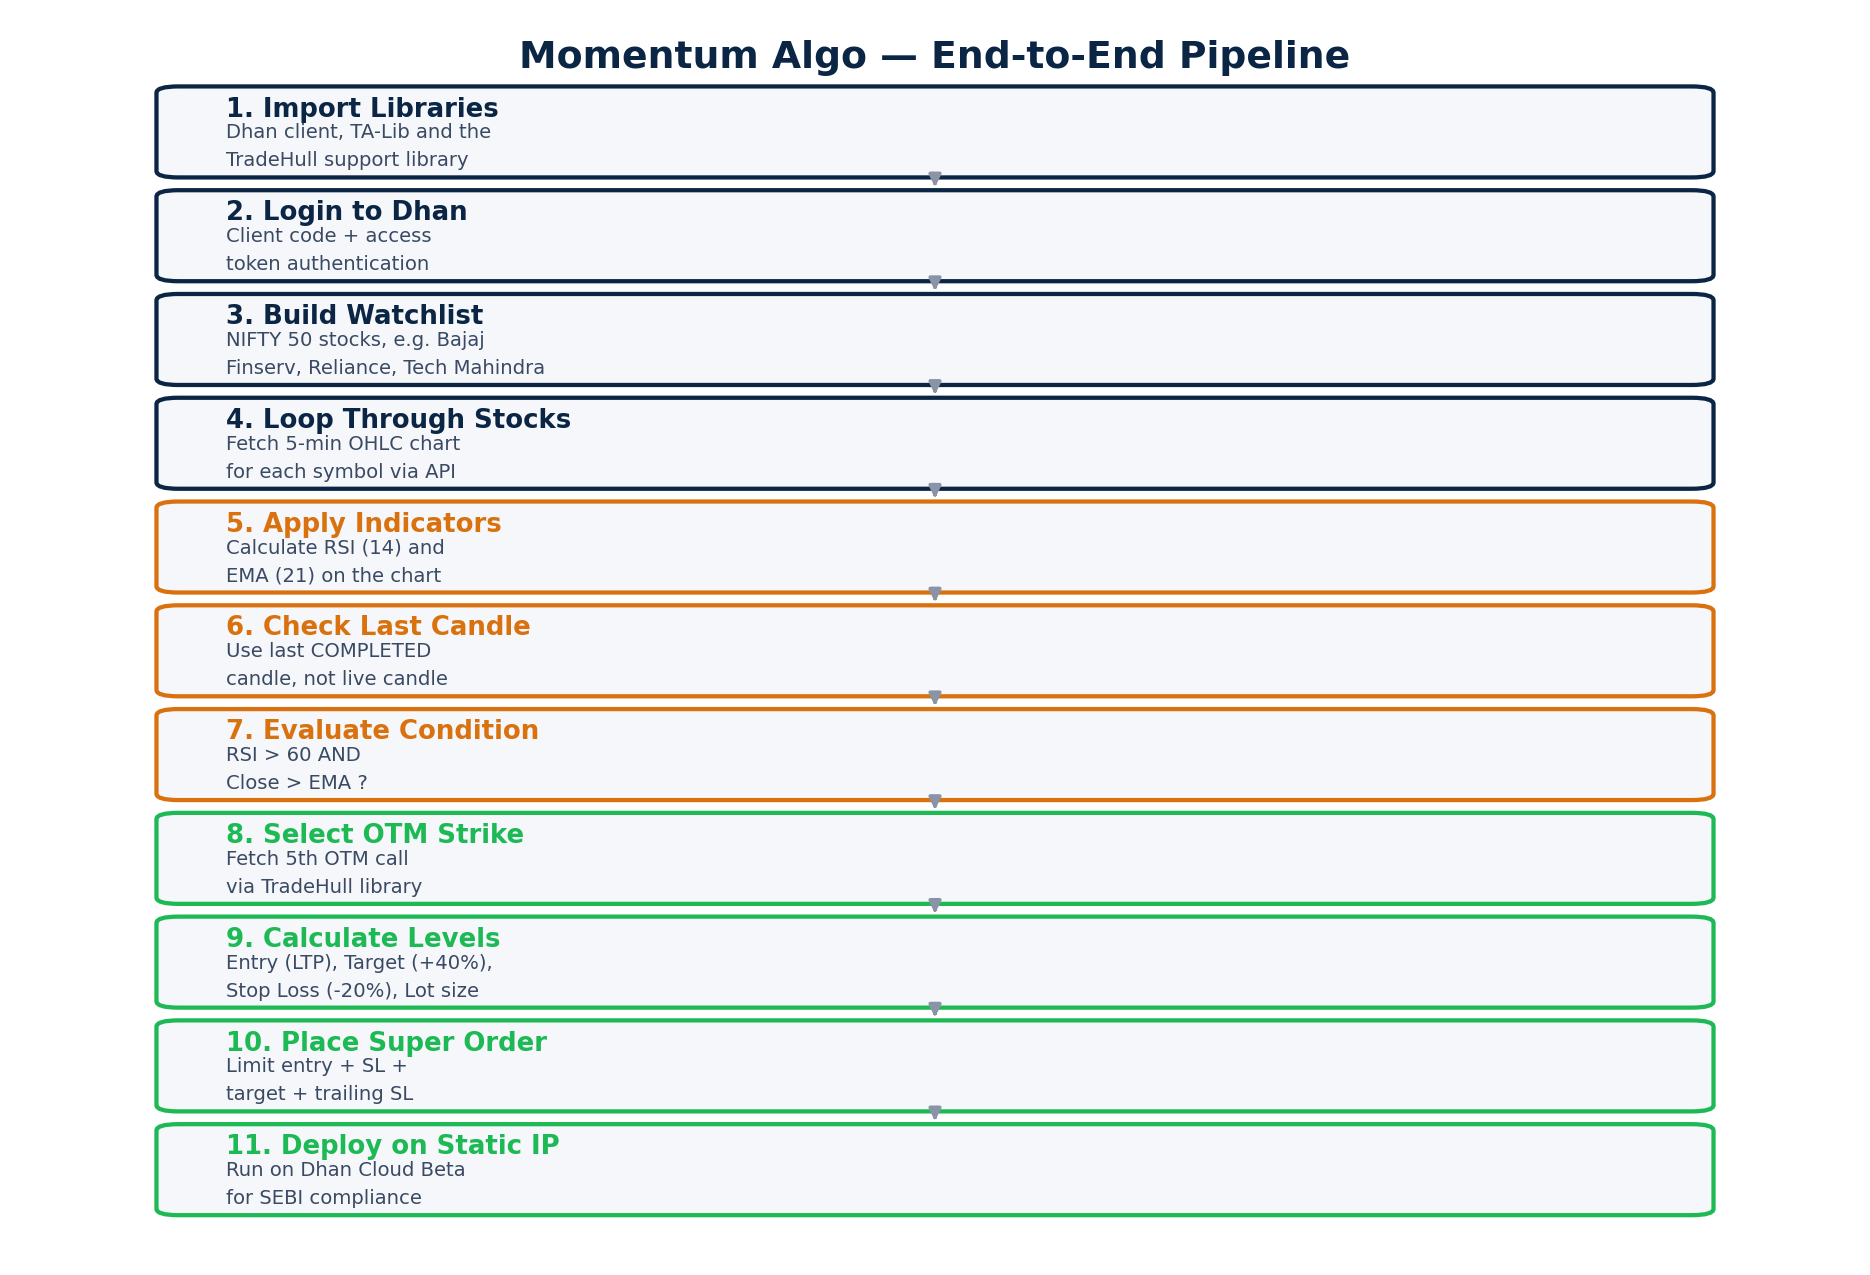
Figure 1: The complete momentum algo pipeline — from importing libraries to firing a live order.
Step 1: Import Your Libraries and Log In
Every algo starts the same way — loading the tools it needs before it can do anything useful.
# Indicator library
import talib

# Dhan API client
from dhanhq import dhanhq
from Dhan_Tradehull import Tradehull

# Credentials
client_code = "YOUR_CLIENT_CODE"
token_id = "YOUR_ACCESS_TOKEN"

# Login
tsl = Tradehull(client_code, token_id)
What’s happening here:
talibis the indicator library that calculates RSI, EMA, and dozens of other technical indicators without you having to write the math yourself.- The Dhan client code and access token authenticate your session — this is the same credential pair you’d use to log into the Dhan platform manually.
- The Tradehull support library wraps Dhan’s raw API into simpler, ready-to-use functions (fetching option chains, OTM strikes, placing Super Orders, and so on) so you don’t have to build all of that from scratch.
Tip: Keep your client code and access token in environment variables or a config file rather than hardcoding them directly in your script — especially before you move this to a cloud server.
Step 2: Build Your Watchlist
Next, define the list of stocks the algo should scan. This is exactly like building a watchlist manually on your trading terminal.
watchlist = ["BAJAJFINSV", "RELIANCE", "SBILIFE", "TECHM"]

for stock in watchlist:
    # scanning logic runs here for each stock
    pass
The algo will loop through this list one stock at a time — Bajaj Finserv first, then Reliance, then SBI Life, and so on — running the exact same scanning logic on each.
Step 3: Fetch Live Chart Data
For every stock in the watchlist, the algo pulls live OHLC (Open, High, Low, Close) chart data through the API — the same price data you’d see plotted on a chart, just represented as rows in a table.
chart = tsl.get_historical_data(
    tradingsymbol="BAJAJFINSV",
    exchange="NSE",
    timeframe="5"  # 5-minute candles
)
print(chart)
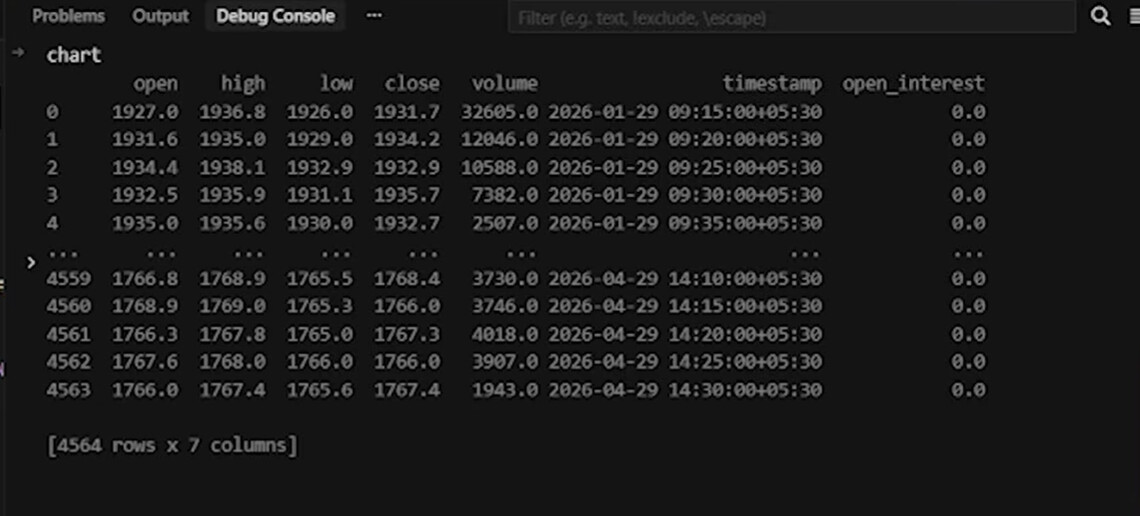
Figure 2: Raw 5-minute OHLC data for Bajaj Finserv, fetched directly through the API — open, high, low, close, volume, and timestamp for every candle.
This is precisely the data your eyes read off a candlestick chart in manual trading — the algo is just receiving it as structured rows instead of visual candles.
Step 4: Apply RSI and EMA Indicators
Now the algo applies the same two indicators you’d add manually to a chart: RSI and EMA.
chart["rsi"] = talib.RSI(chart["close"], timeperiod=14)
chart["ema"] = talib.EMA(chart["close"], timeperiod=21)

last_candle = chart.iloc[-2]  # last COMPLETED candle
print(last_candle)
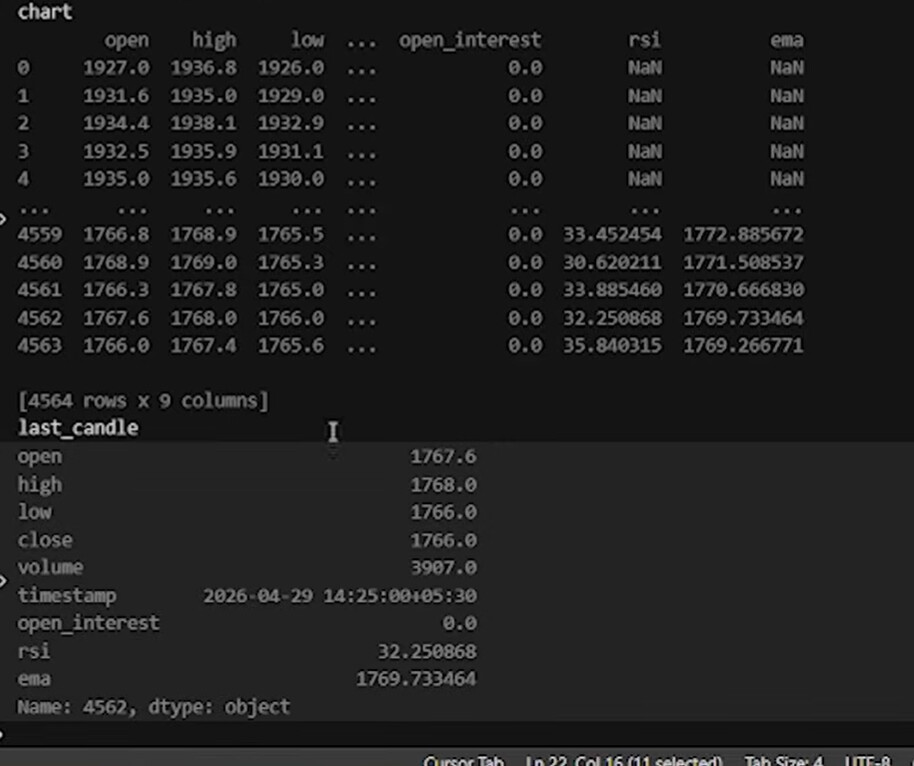
Figure 3: RSI and EMA columns appended to the chart, along with the last completed candle — open, close, RSI, and EMA all visible together.
Important — why the second-last candle? In live markets, the current (forming) candle is incomplete and its values keep changing until it closes. Just like a discretionary trader waits for a candle to close above a level before entering, this algo always evaluates the last completed candle — never the live, still-forming one. Skipping this check is one of the most common mistakes in first-time algo builds.
In the example above, the last completed candle closed at 1766.0 with an RSI of 32.25 — clearly below the bullish threshold, so no trade would trigger here. That’s expected; the algo is designed to wait for the right condition, not force one.
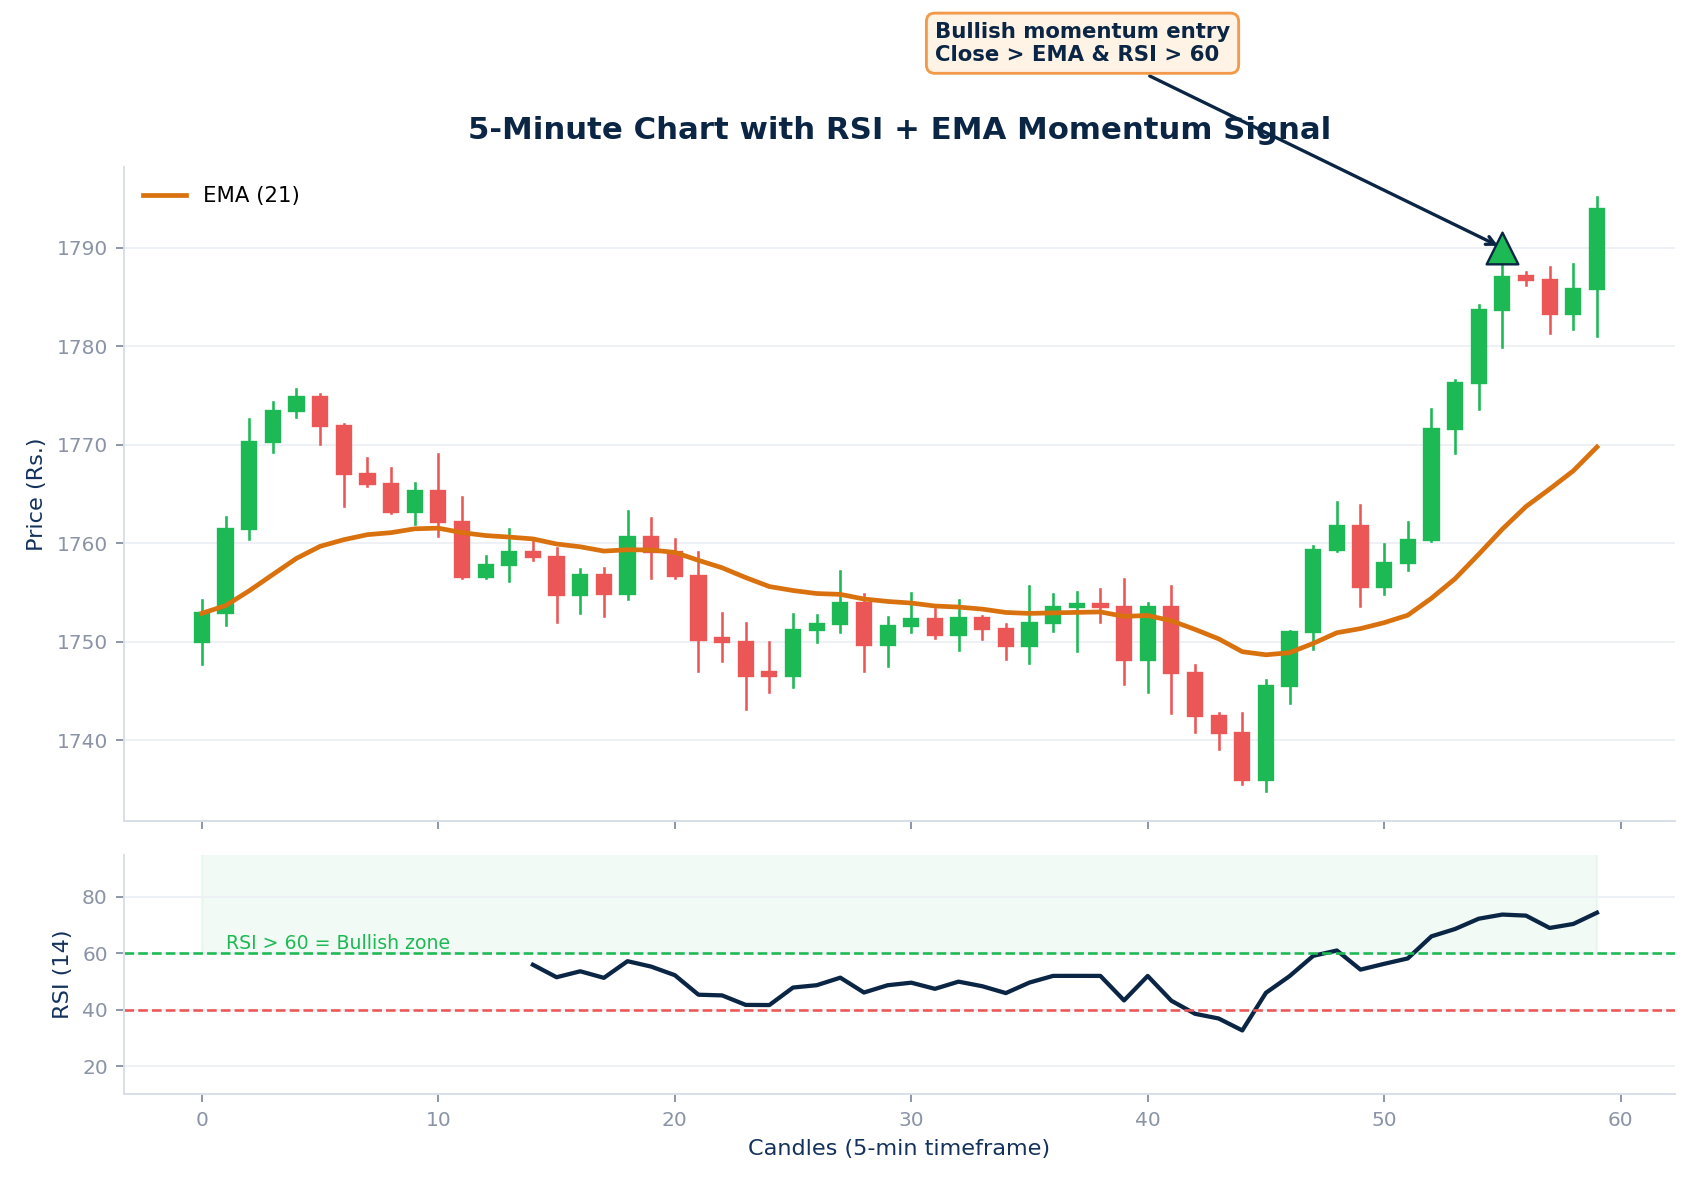
Figure 4: A visual view of what the algo is checking — price relative to EMA (orange line) and RSI momentum in the panel below. The green marker shows where both conditions align for a bullish entry.
Step 5: Define the Entry Condition
This is the heart of the strategy — the exact rule that decides whether to buy.
rsi_value = last_candle["rsi"]
close_price = last_candle["close"]
ema_value = last_candle["ema"]

bullish_momentum = (rsi_value > 60) and (close_price > ema_value)

if bullish_momentum:
    print("Bullish momentum detected — proceed to buy CALL")
| Condition | What It Confirms |
|---|---|
| RSI > 60 | Strong bullish momentum, not just a random uptick |
| Close > EMA | Price is trending above its recent average — confirms an uptrend |
| Both together | A high-probability bullish setup worth acting on |
Note: This mirrors exactly how a discretionary trader reads a chart — “RSI is strong AND price is above my moving average, so I’ll buy.” The algo just automates that same two-condition check, consistently, across every stock in the watchlist, every single time — without fatigue or hesitation.
The mirror-image condition (RSI below a lower threshold and close below EMA) is used to trigger the sell/put side of the strategy, following the same logic in reverse.
Step 6: Auto-Select the OTM Option Strike
Once a bullish signal is confirmed, the algo needs to pick which option to actually buy. Rather than trading At-The-Money (ATM), this strategy specifically targets the 5th Out-of-The-Money (OTM) call — a common approach for reducing premium cost while still capturing directional moves.
otm_symbol = tsl.get_otm_strike(
    tradingsymbol="BAJAJFINSV",
    option_type="CE",
    otm_count=5  # use 1 for ATM, higher numbers move further OTM
)
print(otm_symbol)
# Output: BAJAJFINSV 1860 CALL
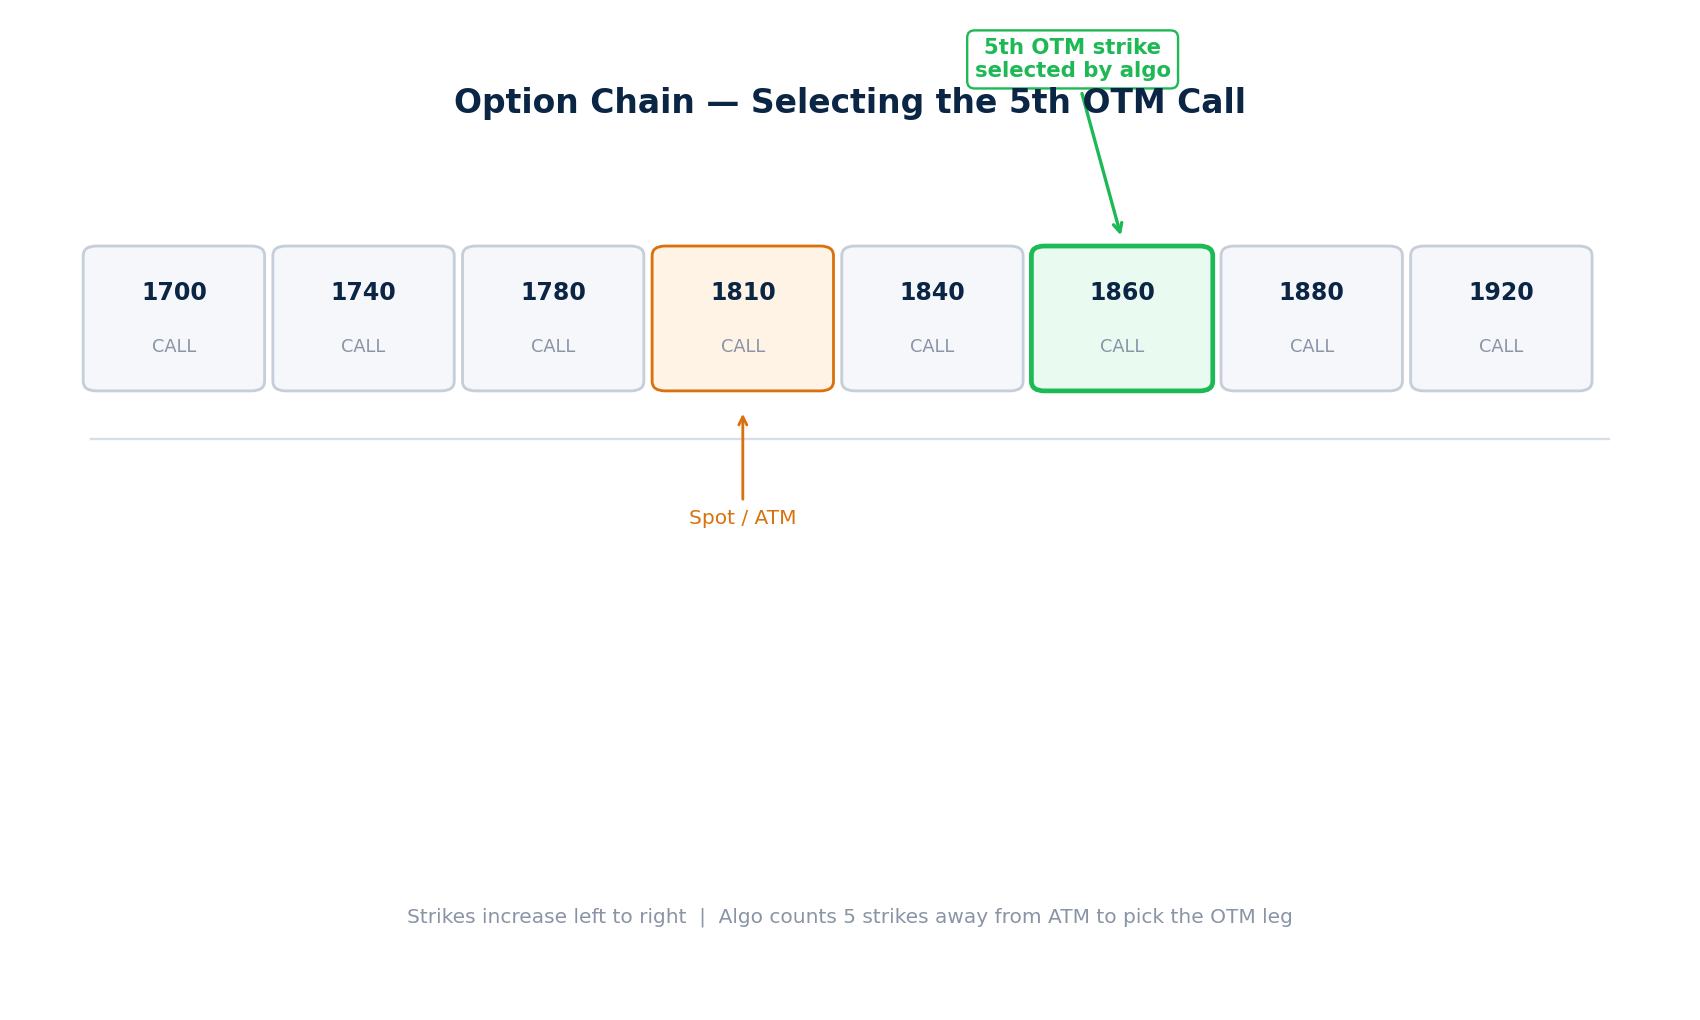
Figure 5: How the algo counts strikes away from the spot/ATM price to land on the 5th OTM call — the same way you’d count strikes manually in an option chain.
otm_countparameter is fully flexible. Passing1selects the nearest OTM (or ATM, depending on your library’s convention), while2,3,4,5move progressively further away from the money. Adjust this based on your own risk appetite and premium budget.
Step 7: Calculate Entry, Stop Loss, and Target
Before placing any order, the algo needs the option’s current price (LTP) to calculate its levels.
entry_price = tsl.get_ltp(tradingsymbol=otm_symbol)

target_price = round(entry_price * 1.4, 1)     # +40%
stop_loss_price = round(entry_price * 0.8, 1)  # -20%

print(f"Entry: {entry_price}")
print(f"Target: {target_price}")
print(f"Stop Loss: {stop_loss_price}")
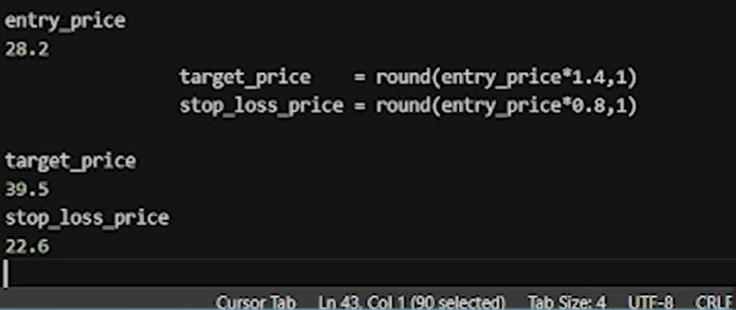
Figure 6: With an entry price of 28.2, the algo calculates a target of 39.5 (+40%) and a stop loss of 22.6 (-20%) — instantly and consistently.
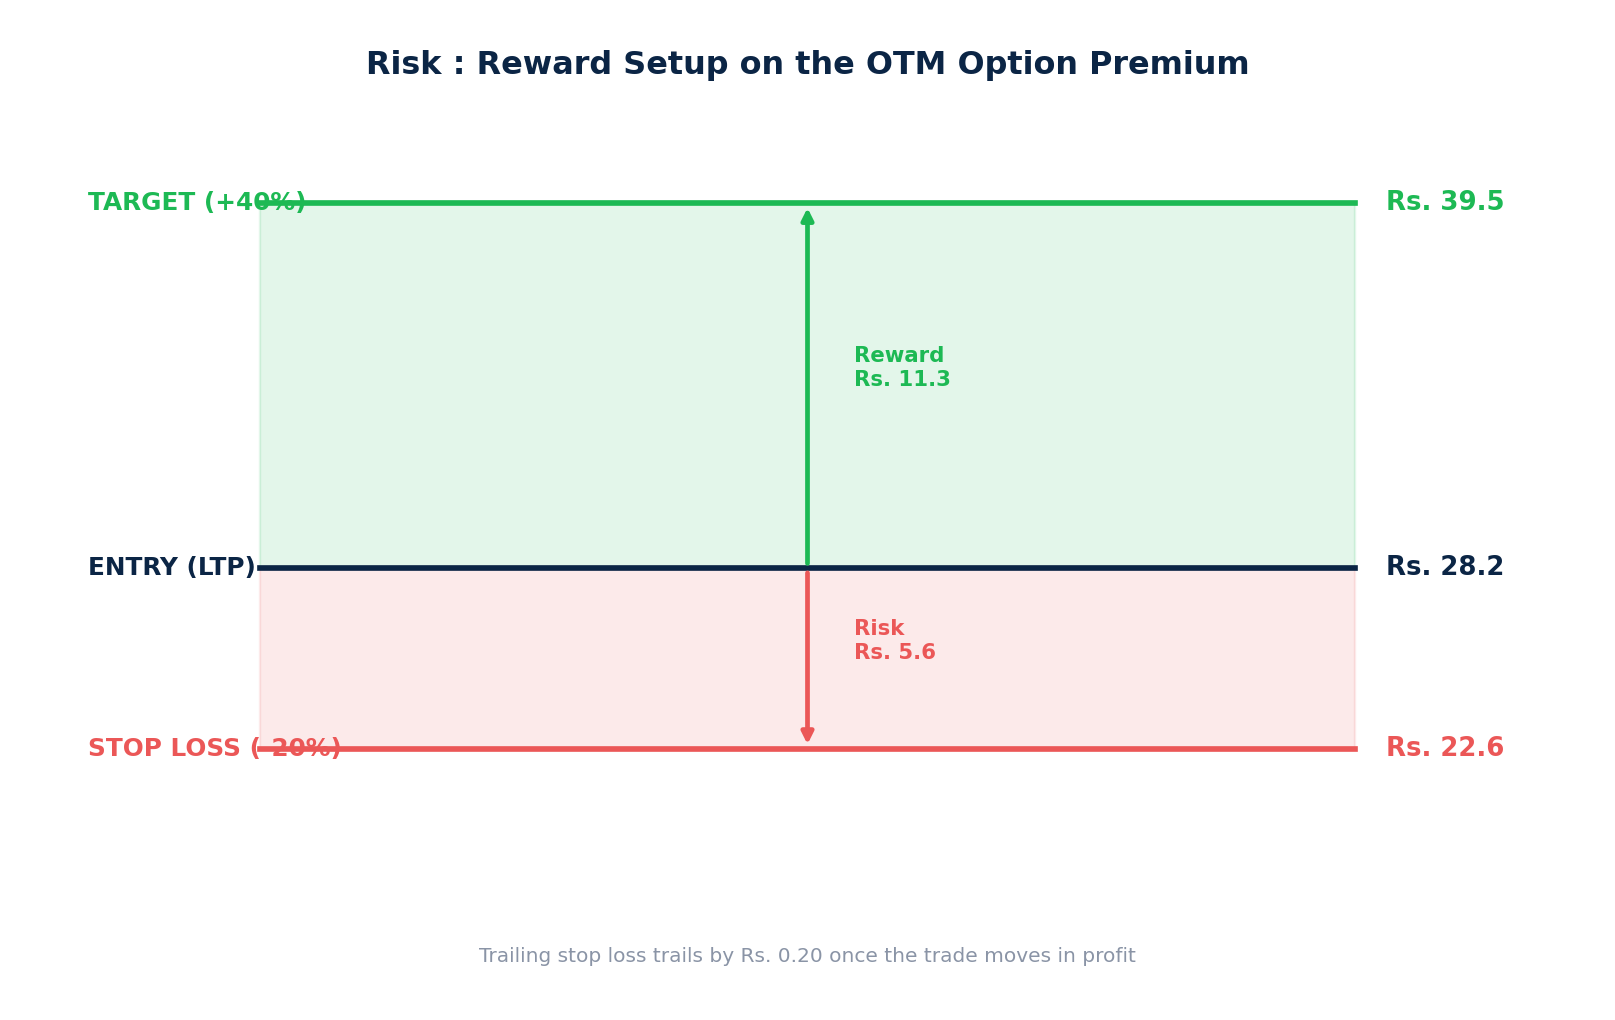
Figure 7: The full risk-reward picture for this trade — Rs. 5.6 of risk against Rs. 11.3 of reward, based purely on the option premium.
| Level | Value | Logic |
|---|---|---|
| Entry (LTP) | Rs. 28.2 | Current market price of the OTM option |
| Target | Rs. 39.5 | Entry × 1.4 (40% gain on premium) |
| Stop Loss | Rs. 22.6 | Entry × 0.8 (20% loss on premium) |
Step 8: Determine Lot Size
Every options contract trades in fixed lot sizes, and the order can’t be placed without specifying this.
lot_size = tsl.get_lot_size(tradingsymbol=otm_symbol)
print(lot_size)
# Output: 250
For this example, Bajaj Finserv’s lot size is 250 — meaning one lot of the option represents 250 units of the underlying.
Step 9: Place the Super Order
This is where everything comes together — entry, stop loss, target, and trailing stop loss are all placed as a single bracketed order.
order = tsl.place_super_order(
    tradingsymbol=otm_symbol,
    transaction_type="BUY",
    quantity=1 * lot_size,        # 1 lot; increase multiplier for more lots
    order_type="LIMIT",
    price=entry_price,
    target_price=target_price,
    stop_loss_price=stop_loss_price,
    trailing_sl=0.20              # trail by Rs. 0.20 once in profit
)
print(order)
At this point, the algo has replicated the entire manual trading workflow — indicator check, timeframe selection, candle confirmation, strike selection, and order placement — in code.
Step 10: SEBI Compliance — Static IP Requirement
Before this algo can run live, there’s one regulatory requirement to satisfy.
Dhan addresses this directly through Dhan Cloud Beta, a platform-provided static IP solution built specifically for this compliance requirement. Rather than running the algo from a local machine, the same code is deployed onto this cloud environment, from which orders are then fired legally and reliably.
Step 11: Deploy and Run Live
With the static IP environment ready, the full script is copied into Dhan Cloud and run from there — no separate server setup or command-line execution is needed on your end. Dhan Cloud hosts the script on its static IP infrastructure and gives you a simple Run control in the platform to trigger it directly.
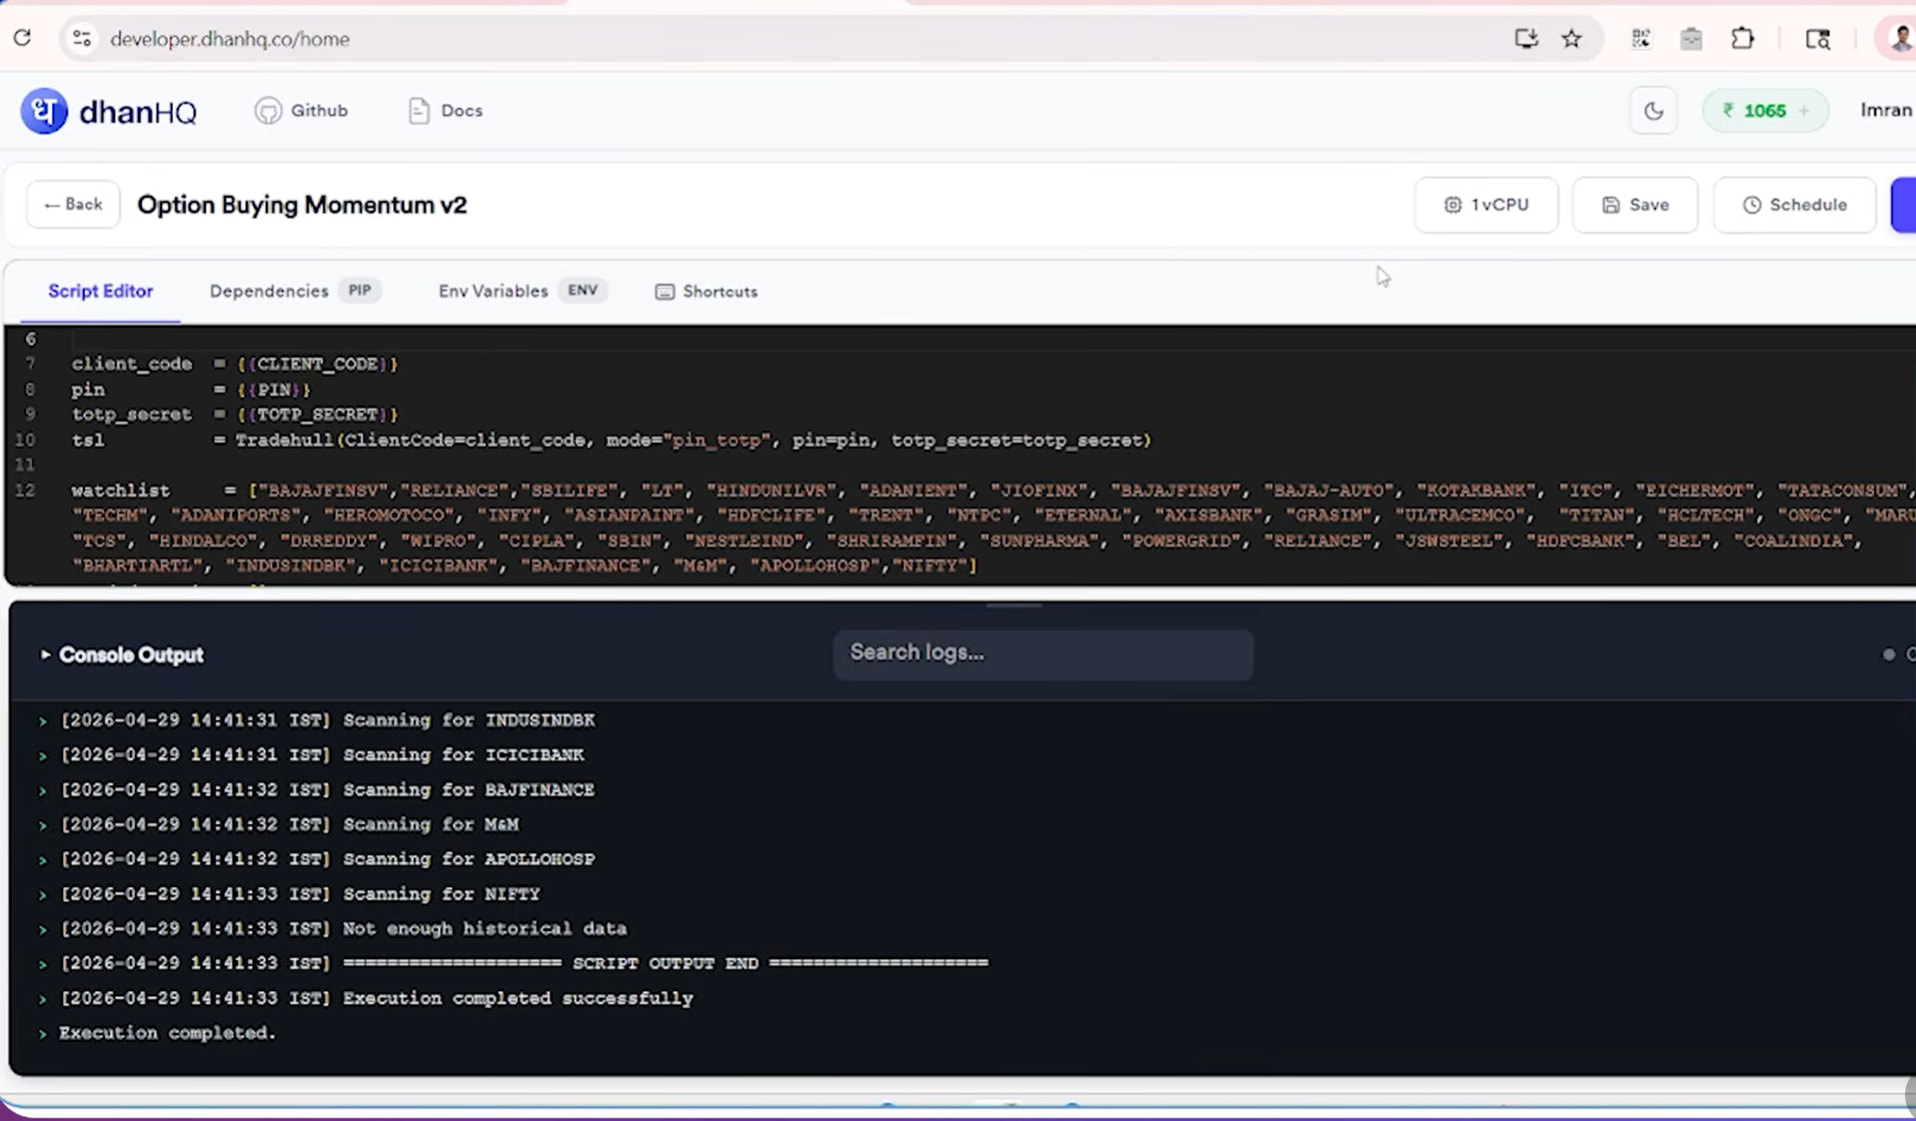
Figure 8: The Dhan Cloud IDE — the Script Editor on top shows the deployed strategy (watchlist, login, credentials), while the Console Output below streams the live scan in real time, stock by stock, as the algo works through the watchlist.
Once triggered, the entire setup — scanning, indicator checks, strike selection, and order placement — runs automatically, without any manual intervention. The console output is a useful way to confirm the algo is alive and progressing correctly: each line logs which stock is currently being scanned, and any issue (such as insufficient historical data for a symbol) is flagged immediately rather than failing silently.
Live Example: Tech Mahindra
In one live run, the algo scanned through the watchlist and found that Tech Mahindra satisfied the entry condition — RSI above 60 and close above EMA on the last completed candle.
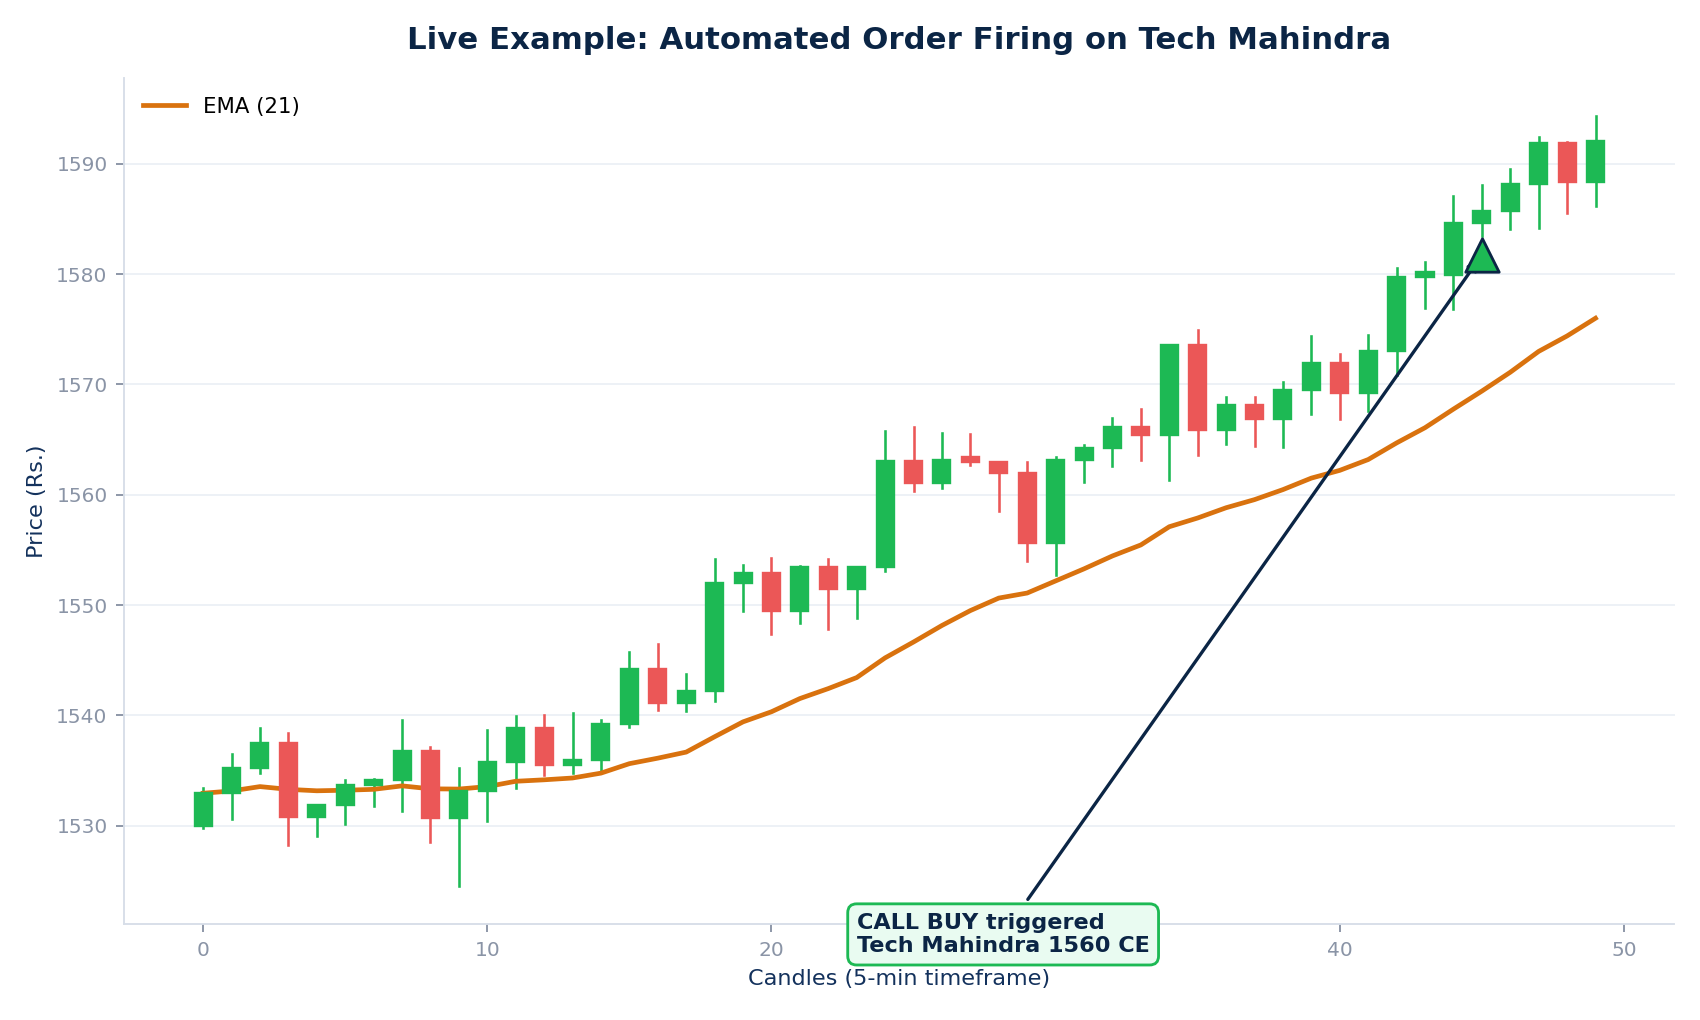
Figure 9: The moment the algo’s condition triggers on Tech Mahindra — RSI and EMA both confirming bullish momentum, followed by an automatic CALL BUY.
The algo automatically:
- Identified the 5th OTM strike — Tech Mahindra 1560 CALL
- Calculated stop loss (~20%) and target (~40%) off the option premium
- Placed the Super Order with both levels attached
- Fired the order — fully unattended
Checking the option chain afterward confirmed the 1560 CE was indeed the correct 5th OTM strike, and the Super Order screen showed both the stop loss and target already in place — exactly as configured in the code.
Automating and Scheduling with Dhan Cloud
Once the algo is working correctly, it doesn’t need to be scheduled with any extra code. Dhan Cloud provides a built-in Schedule Execution feature right in the platform — you simply configure when the script should run, and the platform handles triggering it.
The Schedule Execution dialog offers three modes:
| Mode | What It Does |
|---|---|
| Execute After | Runs the script once, after a chosen delay (1 min, 2 min, 5 min, 30 min, 1 hour, or 2 hours) |
| One-Time | Runs the script once, at a specific date and time you set |
| Recurring | Repeats the script automatically on a set frequency — Daily, Weekly, or Monthly |
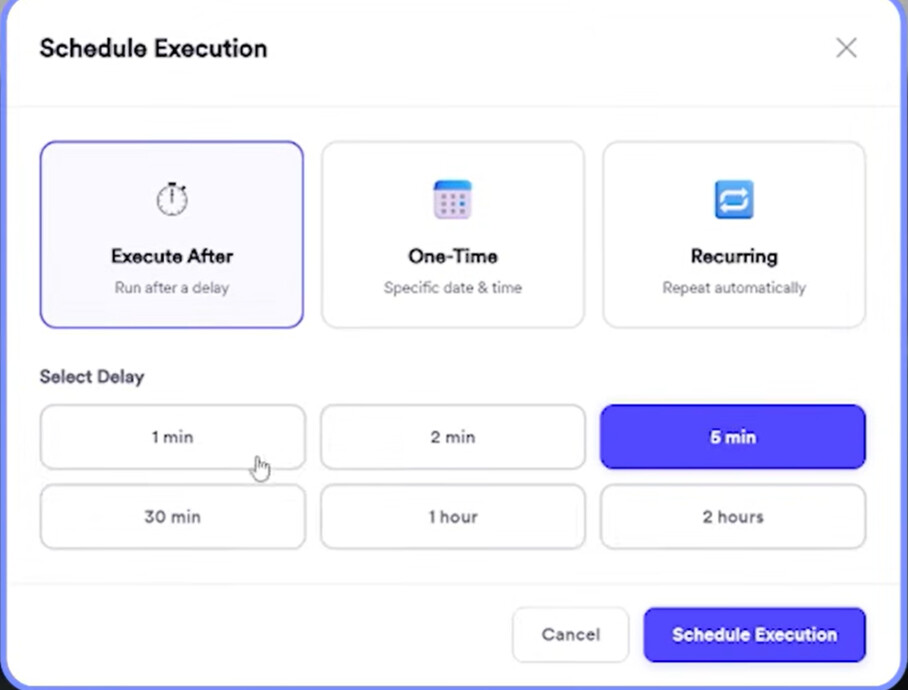
Figure 10: The “Execute After” mode — useful for testing, or for firing the script a fixed delay from now (here, a 5-minute delay is selected).
For a live momentum strategy that needs to run every trading day, Recurring is the mode to use:
- Select Recurring as the execution type
- Set Frequency to Daily or Weekly
- Under Select Days, choose the trading days it should run on (Mon–Fri)
- Set the Time (IST) — typically market open, e.g. 09:15
- Set the Start Date for when the recurring schedule should begin
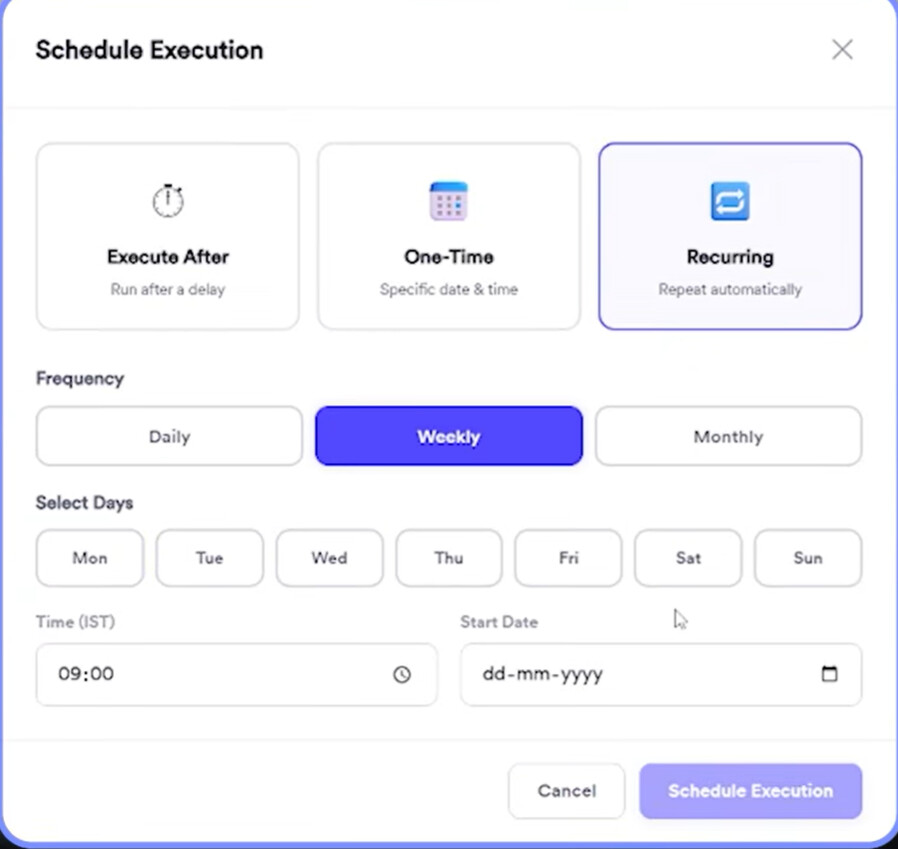
Figure 11: A Recurring schedule configured for Weekly frequency, running Monday through Sunday (adjust to your trading days) at 09:00 IST.
while Truescript is needed — Dhan Cloud’s scheduler handles the triggering natively, which also keeps the execution aligned with the static IP environment required for SEBI compliance.
Once scheduled, the exact same strategy — with no manual changes — enters the market automatically at the configured time and continues running on that schedule until you pause or delete it. This is what separates systematic, passive trading from manually watching charts all day.
Why This Matters
A few years ago, algo trading was a niche pursuit — most retail traders weren’t even aware it was accessible to them. That has changed dramatically. Algo trading is now a core part of how serious traders operate, and increasingly, traders without algo capability risk missing out on the discipline and consistency that automation provides.
Successfully deploying your first working algo is genuinely a milestone. It marks the shift from being someone who trades to being someone who has built a system that trades for them.
Summary
| Step | What Happens |
|---|---|
| 1–2 | Import libraries, authenticate with Dhan |
| 3 | Build watchlist and loop through stocks |
| 4 | Fetch 5-minute OHLC data via API |
| 5 | Apply RSI (14) and EMA (21) indicators |
| 6 | Use the last completed candle only |
| 7 | Check RSI > 60 and Close > EMA for bullish momentum |
| 8 | Auto-select the 5th OTM call strike |
| 9 | Calculate entry, target (+40%), and stop loss (-20%) |
| 10 | Confirm lot size |
| 11 | Place a Super Order with trailing stop loss |
| 12 | Deploy on a static IP for SEBI compliance and run live |
This momentum strategy is intentionally simple — it’s meant to illustrate the process of building an algo, not to serve as a plug-and-play production strategy. Use it as a template: swap in your own indicators, thresholds, and risk parameters, backtest thoroughly, and only then consider deploying live capital.
Resources
- YouTube Video: Build Your Momentum Algo in 20 Minutes
- Code Files (Google Drive): Download the Momentum Algo Code