Hi @Everyone,
If you are building an algo trading system on the Dhan API, there is one skill that separates traders who can only use AI tools from traders who can actually direct them: a working knowledge of Python.
It is tempting to think that with tools like Claude, ChatGPT, and Cursor now available, learning to code yourself has become optional. After all, why not simply ask an AI to “build the algo” and be done with it?
Here is the problem with that shortcut.
Analogy — The Cab Ride Imagine you are new to Mumbai and you book a cab. You sit back, relax, and scroll through reels while the driver takes you to your destination. Now imagine the driver takes a wrong turn. Because you were not paying attention to the map, you would never even know you were being driven to the wrong place — let alone be able to correct it.
AI tools work the same way. Every AI product carries some version of the same disclaimer: answers may not always be factually correct, and the AI can make mistakes. If you don’t understand Python at all, you have no way of knowing when your AI-generated algo has gone off course. You will never be able to reach your destination reliably.
This is exactly why a beginner in algo trading should still learn the fundamentals of Python — not to write every line by hand forever, but to be able to direct AI correctly, read what it produces, and catch mistakes before they cost you money.
The good news: Python is genuinely one of the easier programming languages to pick up, and if you’re already comfortable with Excel formulas, you already have the right mindset to learn it. This guide walks through the ten core Python building blocks every algo trader needs, using the same examples and workflow used while building live trading algorithms on the Dhan API.
Setting Up: Run Mode vs. Debug Mode
Before writing any code, it helps to understand the two ways a Python file can be executed inside an editor like Cursor or VS Code:
| Mode | What It Does | When to Use It |
|---|---|---|
| Run | Executes the entire program from start to finish in one go | Once your code is complete and tested |
| Debug | Executes the program line by line, pausing wherever you place a breakpoint | While learning, testing, or troubleshooting |
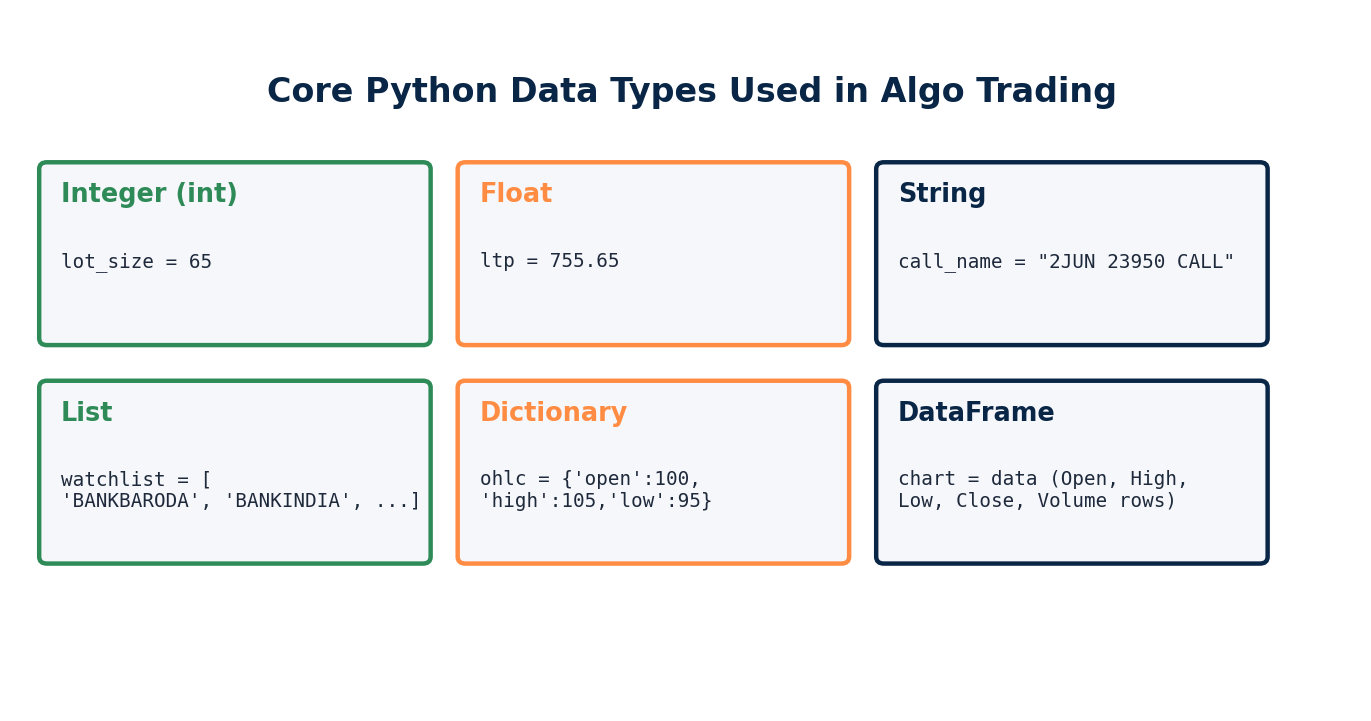
Figure 1: The six core Python building blocks covered in this guide.
Tip — Use Debug Mode While Learning A breakpoint is a marker (usually shown as a red dot next to a line number) that tells the debugger where to pause. When you run a file in debug mode, execution stops the moment it reaches your breakpoint, and you can inspect the value of every variable at that exact point in the code. This is the single best way to understand what a new script is actually doing, line by line, instead of guessing from the output alone.
1. Numbers: Integers and Floats
Python organizes numeric data into two main types:
- Integer (
int) — a whole number with no decimal point. Example:lot_size = 65 - Float — a number that includes a decimal point. Example:
ltp = 755.65
With both types, you can perform the usual arithmetic — addition, subtraction, multiplication, and division — exactly as you would in an Excel formula. You can also compare numeric values against each other, which is the foundation of every trading condition you will eventually write:
# Comparing values
rsi > 60    # Is RSI greater than 60?
rsi < 40    # Is RSI less than 40?
These two lines look simple, but they are quite literally the building blocks of every entry and exit rule you will code into a strategy.
Variables: Naming Your Data
Whenever you write a statement like:
lot_size = 65
Python takes the value on the right (65) and stores it inside the name on the left (lot_size). This is called a variable. From that point forward, anywhere you use lot_size in your code, Python substitutes in the value 65.
Every manual trading habit you already have translates directly into variables:
max_trade = 3          # Maximum number of trades allowed
capital = 100000        # Total capital available
If you can build a formula-driven spreadsheet in Excel, you already think in exactly the structure Python needs — it is genuinely not a big deal.
Converting Floats to Integers
Here’s a real scenario that comes up constantly in options trading. Suppose you calculate the number of shares or contracts to buy using:
quantity = capital_per_trade / ltp
This division often produces a decimal result — for example, 132.132. But brokers like Dhan do not allow fractional quantities. You cannot place an order for 132.132 units of anything.
The fix is to wrap the result inside Python’s built-in int() function, which strips away everything after the decimal point:
quantity = int(capital_per_trade / ltp)
# 132.132 becomes 132
Note:
int()truncates rather than rounds — it simply removes the decimal portion. For an order-quantity calculation, this is exactly the behavior you want, since rounding up could mean requesting more capital than you actually allocated.
Equality Checks
Python also lets you check whether two values are exactly equal using == (two equal signs, not one):
rsi == 60.55 # True, if rsi currently equals exactly 60.55
This is a different operation from =, which assigns a value. == only asks a yes/no question — it never changes anything.
2. Strings: Working with Text
A string is simply text — any sequence of letters, numbers, or symbols wrapped inside quotation marks. Anywhere you need to store or display words instead of numbers, you’re working with a string.
symbol = "TCS"
call_name = "2JUN 23950 CALL"
entry_price = 160
Strings become genuinely useful once you start combining them with variables to build readable messages — for example, a trade confirmation you might print to your terminal or log file:
message = "Entry in " + call_name + " with price " + str(entry_price)
print(message)
# Output: Entry in 2JUN 23950 CALL with price 160
Why do some values need quotes and others don’t? Quotes are only required on the right-hand side of an
=sign, and only when the value itself is text.call_name = "2JUN 23950 CALL"needs quotes because the value is a string.entry_price = 160does not, because160is a number. The variable name on the left never takes quotes, regardless of type.
3. Lists: Ordered Collections
A list is Python’s version of a watchlist — an ordered collection of items, stored under a single variable name.
watchlist = ["BANKBARODA", "BANKINDIA", "TORRENTPOWER", "SPARC", "LTFOODS", "VBL", "UNIONBANK"]
Every list begins and ends with square brackets [ ], with each item separated by a comma.
Indexing: Finding an Item’s Position
The single most important thing to understand about Python lists is that counting starts at zero, not one.
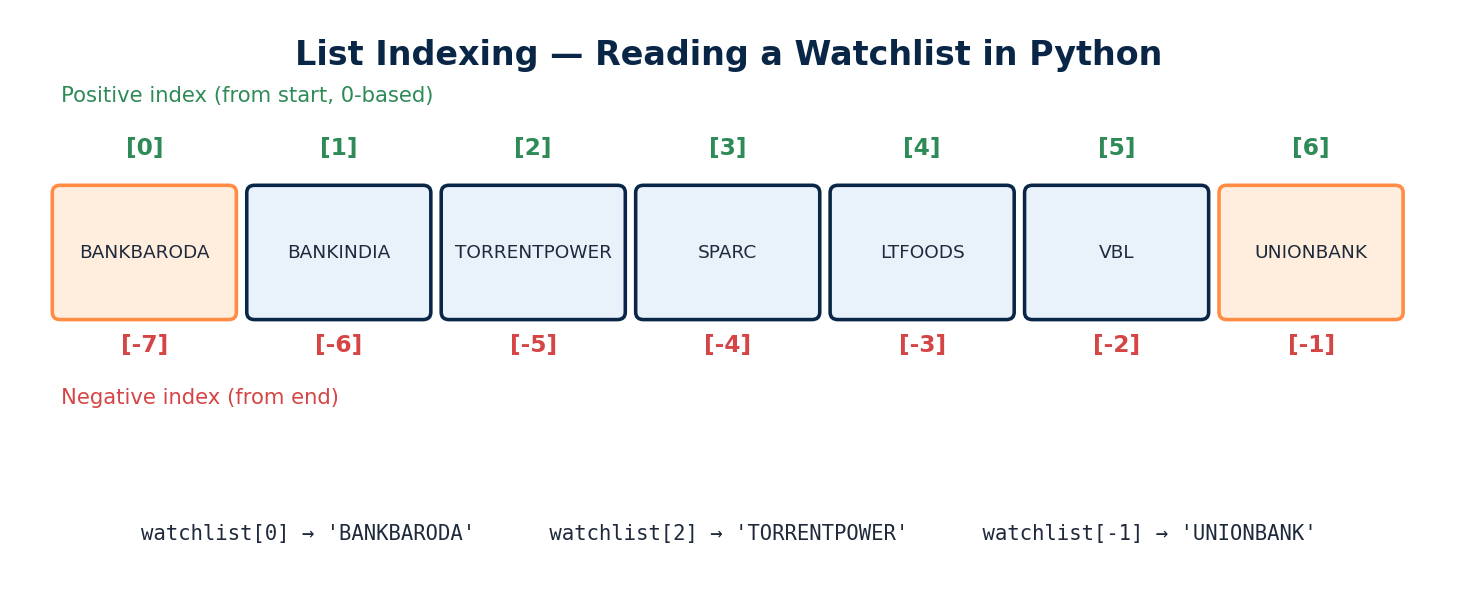
Figure 2: Positive indexes count from the start of the list (0, 1, 2…); negative indexes count backward from the end (-1, -2, -3…).
watchlist[0]   # 'BANKBARODA'  — first item
watchlist[2]   # 'TORRENTPOWER' — third item
watchlist[-1]  # 'UNIONBANK'    — last item
watchlist[-2]  # 'VBL'          — second-last item
This negative indexing is especially useful later when working with live market data — the most recent candle in a price series is almost always addressed as [-1].
Adding Items with .append()
To add a new item to the end of an existing list, use .append():
watchlist.append("ZEEL")
print(watchlist)
# ['BANKBARODA', 'BANKINDIA', ..., 'UNIONBANK', 'ZEEL']
Practice tip: The fastest way to internalize how lists behave is to run one in debug mode and print it after every change. Watching the list grow one item at a time, in real time, makes indexing click far faster than reading about it.
4. Dictionaries: Key–Value Relationships
A dictionary stores data as pairs — a key and its corresponding value. Use a dictionary any time you need to describe a relationship between a label and a piece of data.
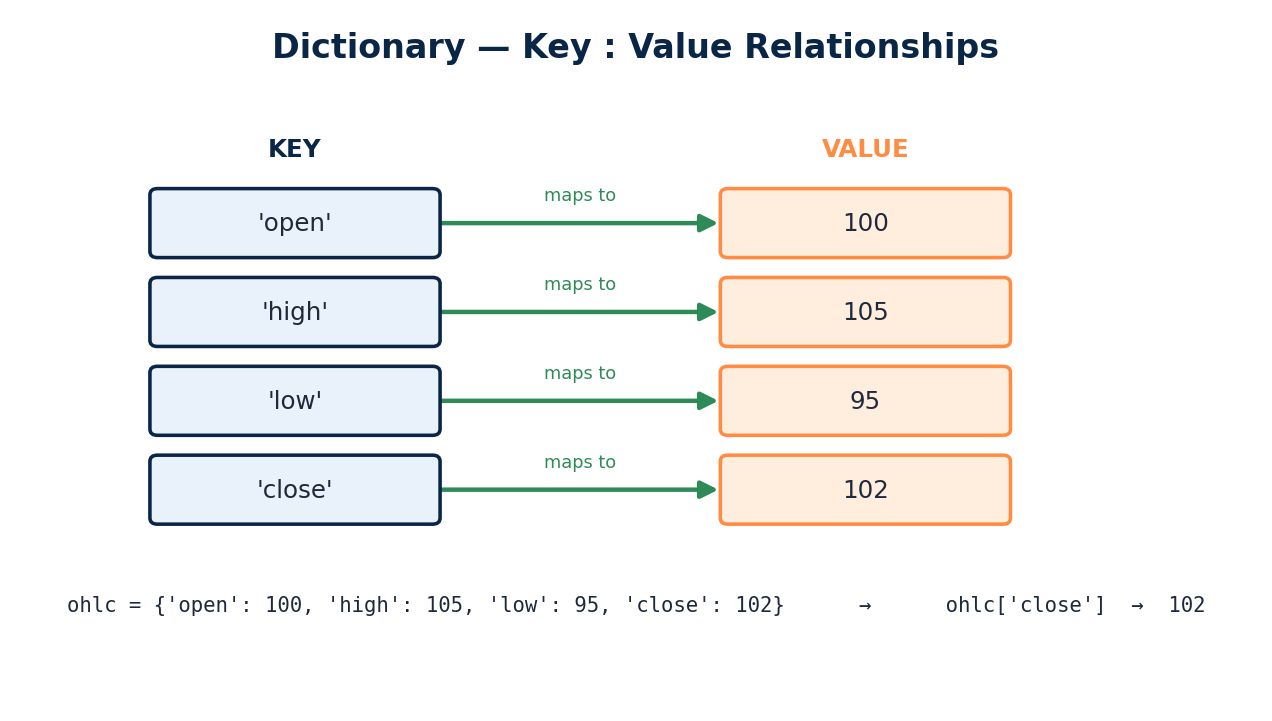
Figure 3: A dictionary maps each key directly to its value — here, OHLC price fields.
ohlc = {
    "open": 100,
    "high": 105,
    "low": 95,
    "close": 102
}

print(ohlc["close"])   # 102
This pattern shows up constantly in algo trading — for example, storing a lot size dictionary so your code can look up the correct lot size for any symbol on demand:
lot_size = {
    "ACC": 400,
    "CIPLA": 700
}

print(lot_size["CIPLA"])   # 700
A dictionary’s structure always follows the same rhythm: a key, followed by its value, followed by the next key, followed by its value — just like a word in a dictionary followed by its meaning.
5. For Loops: Scanning a Watchlist Automatically
Think about how manual scanning normally works: you open HDFC Bank’s chart, check the RSI, close it, open ICICI Bank, check RSI again, then State Bank of India, and so on — one stock at a time, by hand. Depending on your watchlist size, this can easily consume several hours a day.
A for loop automates exactly this repetitive, sequential process.
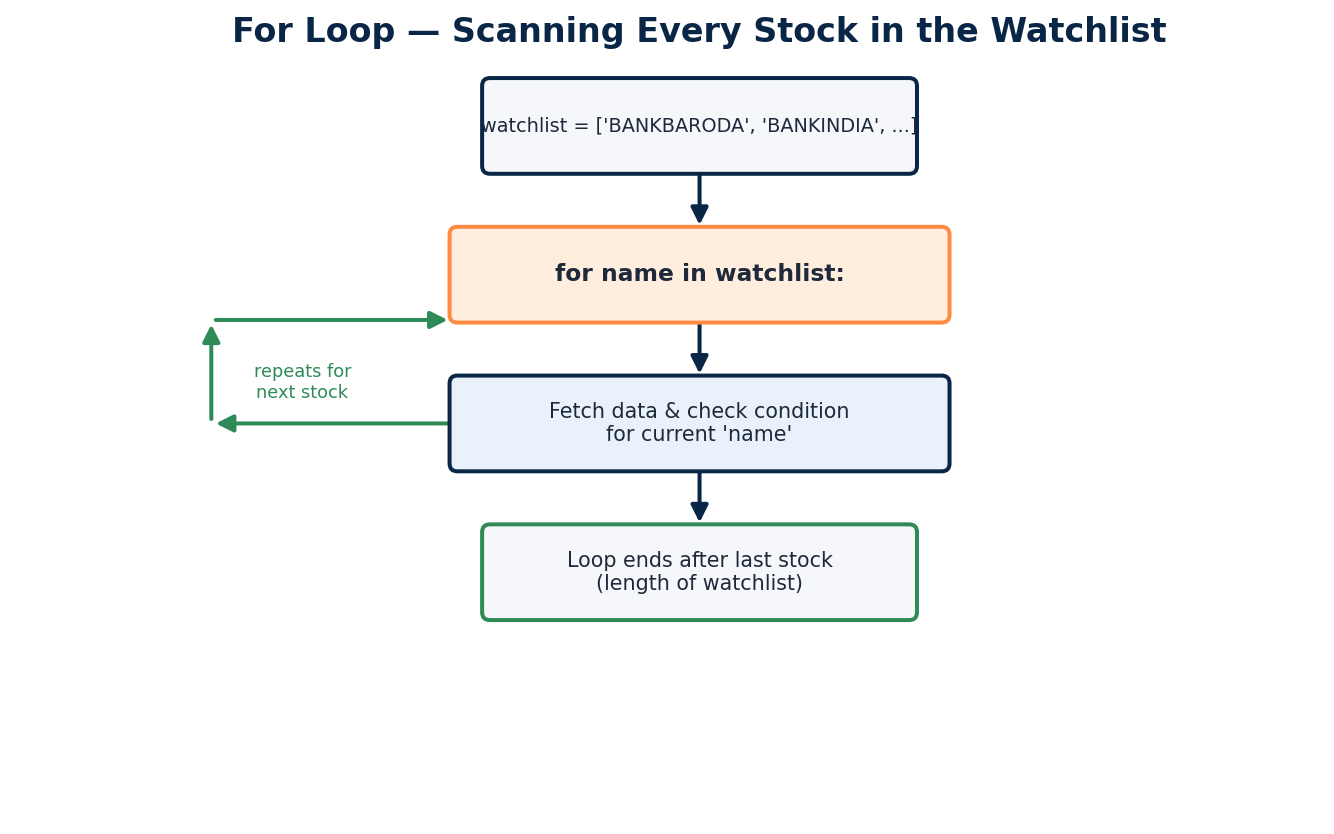
Figure 4: A for loop repeats the same action for every item in a list, one at a time, until the list is exhausted.
watchlist = ["BANKBARODA", "BANKINDIA", "TORRENTPOWER"]

for name in watchlist:
    print("Scanning for", name)
Output:
Scanning for BANKBARODA
Scanning for BANKINDIA
Scanning for TORRENTPOWER
On each pass through the loop, the variable name takes on the next value from the list — first "BANKBARODA", then "BANKINDIA", then "TORRENTPOWER" — until every item has been visited exactly once. The loop then stops automatically once it reaches the end of the list.
This is the mechanism that turns a multi-hour manual scanning routine into a script that runs in seconds.
6. If–Else: Turning Rules into Decisions
Once your loop is scanning through stocks, you need a way to act on what it finds. That’s the role of if–else logic — it lets your code make a decision based on a condition.
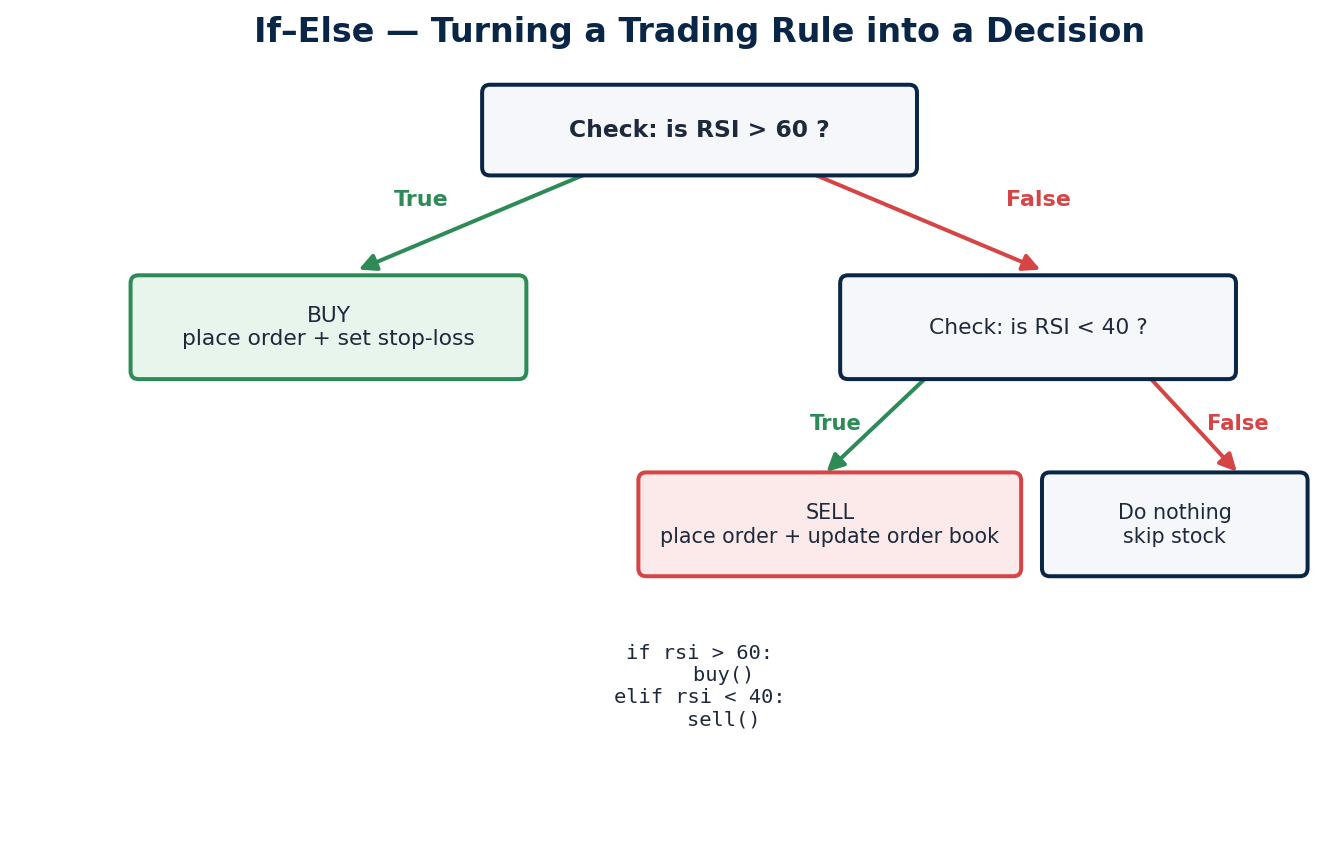
Figure 5: A simple two-condition trading rule expressed as if–elif–else logic.
if rsi > 60:
    buy()              # Place buy order, set stop-loss, update order book
elif rsi < 40:
    sell()              # Place sell order, update order book
else:
    pass                # Condition not met — do nothing, move to next stock
Python checks each condition from top to bottom. If the first (if) condition is True, it executes that block and skips the rest. If it’s False, Python checks the next condition (elif), and so on. If none of the conditions are met, nothing happens — the code simply continues to the next stock in the loop.
Combining a For Loop with If–Else
This is where the real power shows up: looping and decision-making combined.
watchlist = ["BANKBARODA", "BANKINDIA", "SPARC", "LTFOODS"]

for name in watchlist:
    if len(name) >= 9:
        print(name, "— BUY condition met")
    elif len(name) < 5:
        print(name, "— SELL condition met")
    else:
        print(name, "— no condition met, skipping")
Here, the loop visits every stock one by one, and for each stock, the if–else block independently checks whether a condition is true. This exact pattern — loop through a watchlist, evaluate a condition for each item, act accordingly — is the structural skeleton of almost every scanning algorithm you will ever build.
7. While Loops: Running Continuously
A for loop runs a fixed number of times — exactly as many times as there are items in your list. A while loop behaves differently: it keeps running indefinitely, for as long as its condition stays True.
Live trading itself is essentially a while loop. You start your algorithm at market open, and it keeps running continuously — checking prices, watching for signals — until you deliberately stop it or a specific exit condition is met.
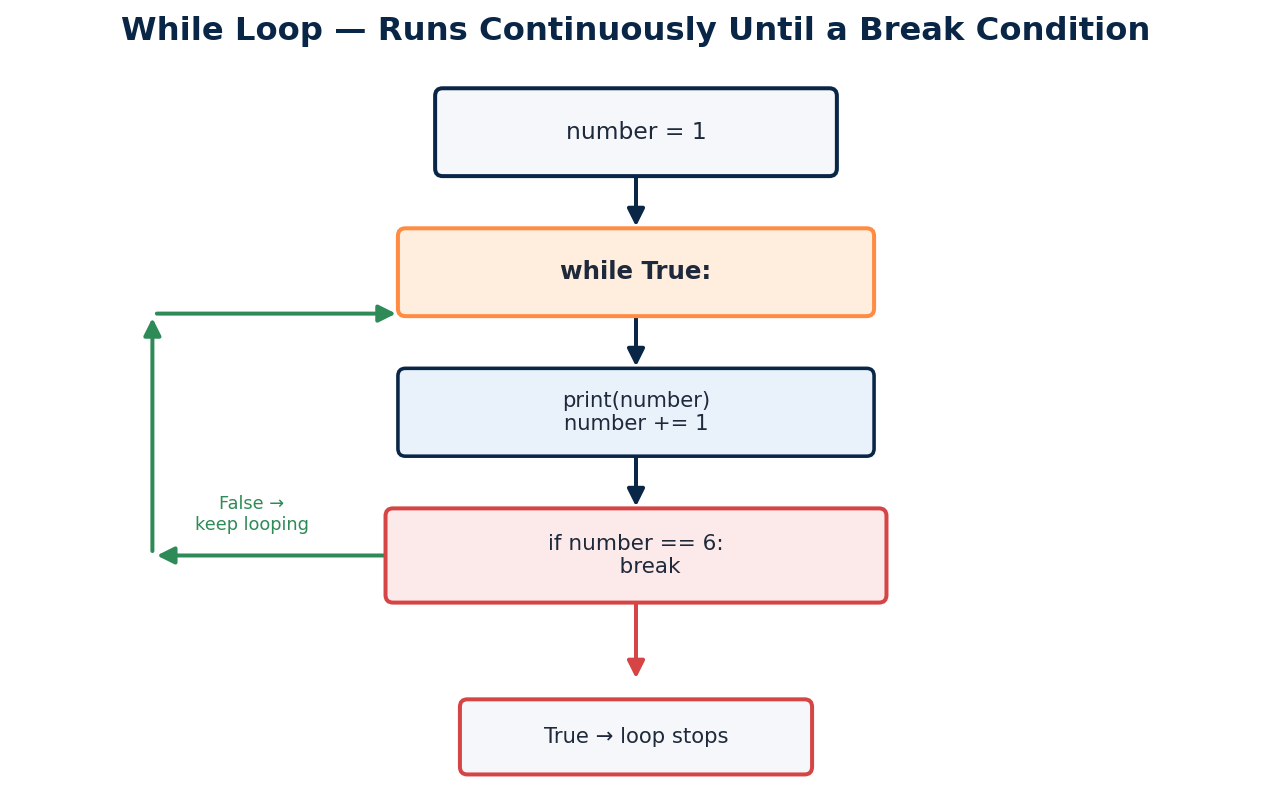
Figure 6: A while loop runs indefinitely until an explicit break condition stops it.
number = 1
while True:
    print(number)
    number += 1
    if number == 6:
        break
Warning: A
while True:loop with nobreakcondition will run forever — it will only stop if you manually interrupt the program or the machine running it shuts down. Always pair awhileloop with a clear exit condition, whether that’s abreakstatement, a time-based cutoff, or a market-close check.
8. DataFrames: The Real Shape of Market Data
This is arguably the most important concept in the entire list, because it’s the structure that every price chart actually takes once it reaches your code.
A DataFrame organizes market data the same way a spreadsheet does — in rows and columns. Each row typically represents one candle, and the columns hold Open, High, Low, Close, and Volume.
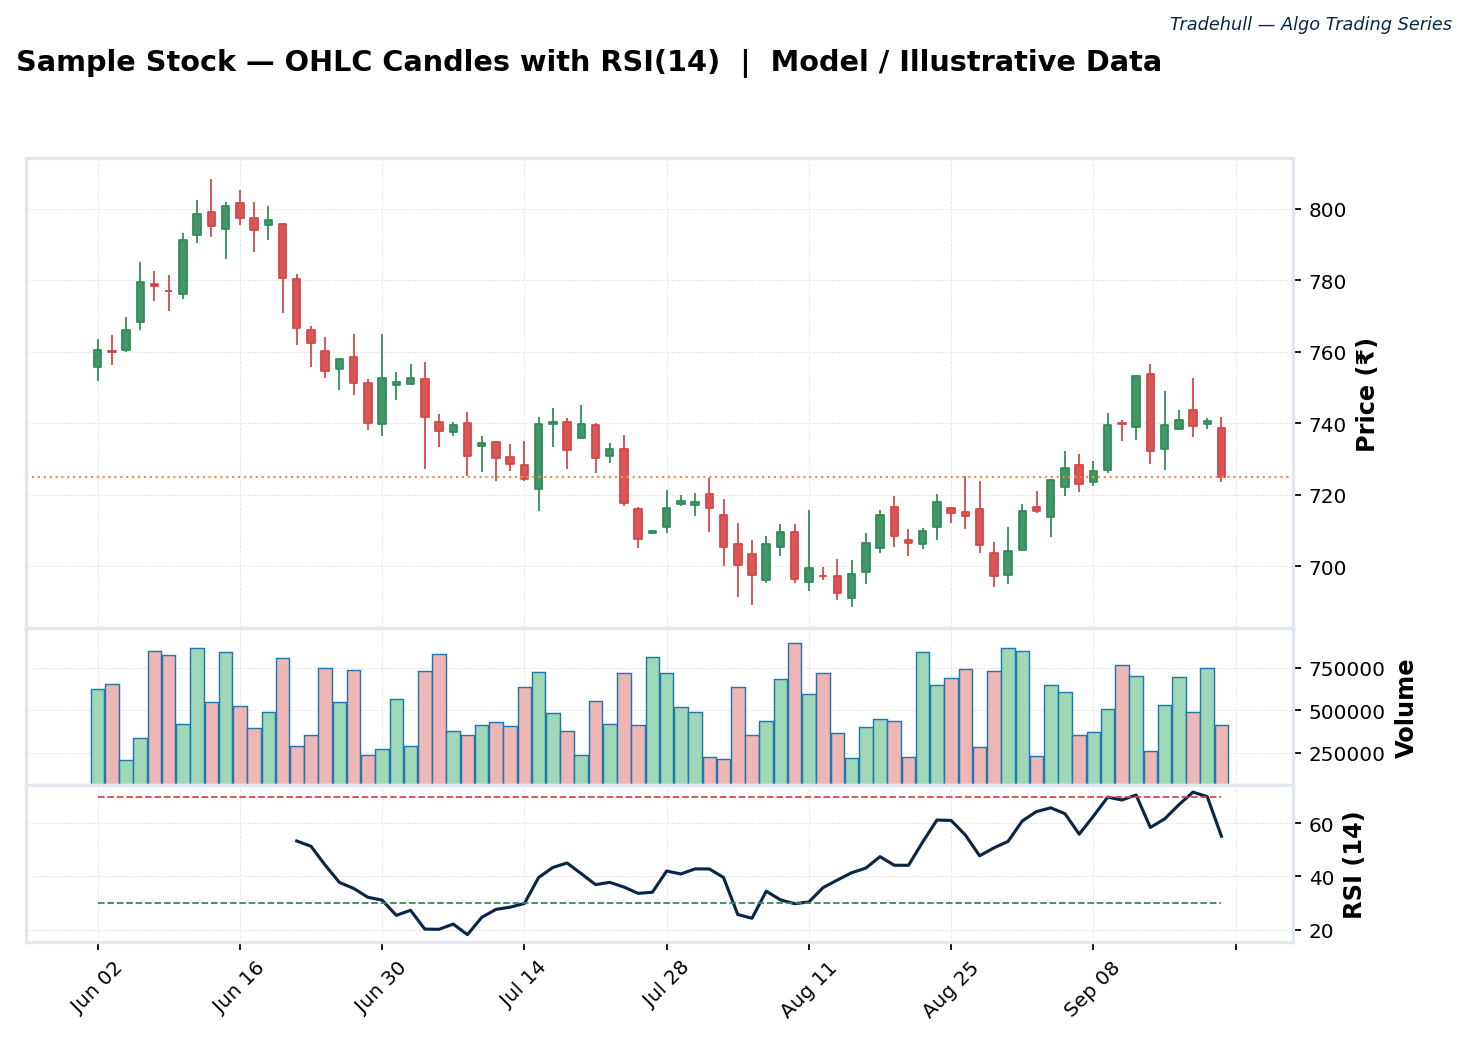
Figure 7: Once OHLC data sits inside a DataFrame, you can chart it, calculate indicators like RSI, and query any value directly — model data shown for illustration.
chart.columns
# Index(['Open', 'High', 'Low', 'Close', 'Volume'], dtype='object')

chart["Close"]                       # the full Close column
(chart["Close"] + chart["Open"]) / 2  # a custom calculated column
Accessing Specific Rows
Just like list indexing, -1 refers to the last row, and -2 refers to the second-to-last row:
chart.iloc[-1]    # the most recent candle
chart.iloc[-2]    # the previous candle
Important — The Live Candle When you pull data from a broker API like Dhan’s, the response usually includes the candle that is still forming (the current, incomplete one). This means
chart.iloc[-1]may not represent a completed candle — it could still be updating. For most scanning logic, you’ll want to referencechart.iloc[-2]as your last fully completed candle, and treatchart.iloc[-1]as the live, in-progress price action.
Common DataFrame Operations
| Operation | Code | Purpose |
|---|---|---|
| Average volume | chart["Volume"].mean() |
Typical trading activity |
| Highest high | chart["High"].max() |
Resistance reference point |
| Lowest low | chart["Low"].min() |
Support reference point |
| Yesterday’s high | chart["High"].iloc[-2] |
Prior-day reference |
| RSI on last candle | chart["RSI"].iloc[-1] |
Current momentum reading |
Worked Example: Calculating a Gap
A gap-up or gap-down scan is a common condition in momentum strategies. It’s calculated as the percentage difference between today’s open and yesterday’s close:
gap_percent = ((today_open - yesterday_close) / yesterday_close) * 100

if gap_percent > 2:
    print("Significant gap-up:", gap_percent, "%")
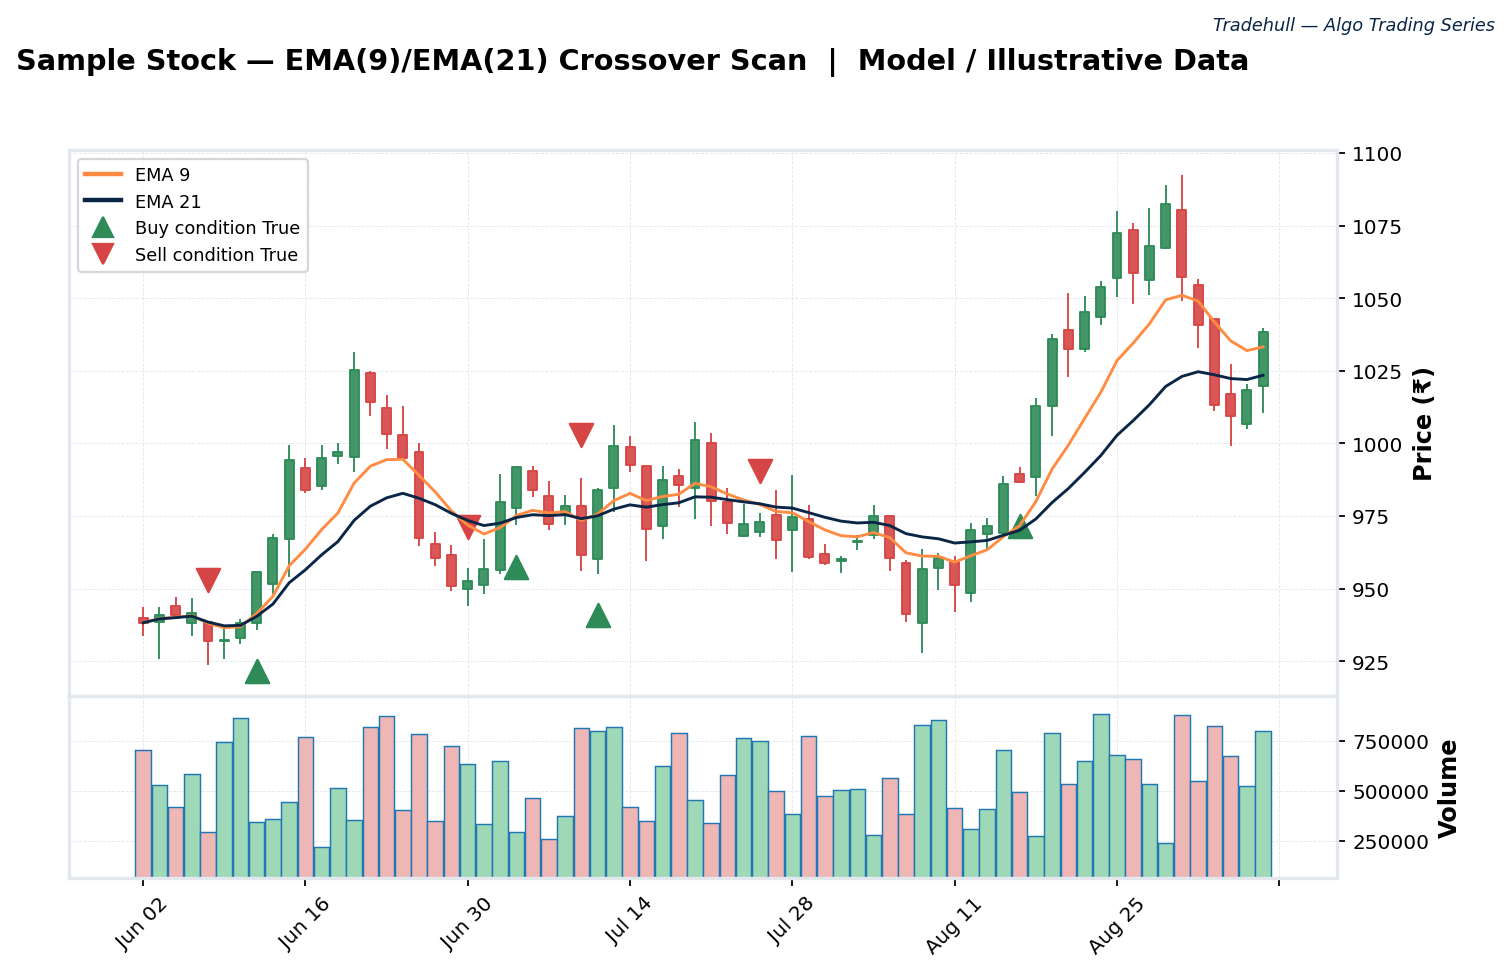
Figure 8: Once conditions like a gap, an RSI threshold, or a moving-average crossover are calculated from a DataFrame, they can trigger buy or sell markers exactly like this — model data shown for illustration.
Once this single calculated value exists, your algo can act on it directly — exactly the same way it acts on RSI, EMA crossovers, or any other computed condition.
Bringing It All Together
Every one of these ten building blocks — integers, floats, variables, strings, lists, dictionaries, for loops, if–else logic, while loops, and DataFrames — combines to form a working algorithm. None of them are complicated in isolation. What makes an algo strategy feel complex is simply how many of these pieces are stacked together at once.
The comparison to when you first entered the stock market is a useful one. You didn’t know what a lot size was, or what “expiry” meant, or how a limit order worked — until you learned those words, one at a time. Python works exactly the same way. Today you met ten new “words.” With practice, they will feel just as natural as NSE, expiry, and lot size do now.
And here’s the encouraging part: you don’t need to memorize every syntax rule or become a Python expert. AI tools are genuinely excellent at handling the fine details of syntax. Your job is to understand these concepts well enough to direct the AI accurately, read its output critically, and know when something has gone wrong — the same way you’d want to know if your cab driver took a wrong turn.
Homework: Practice Before the Next Video
-
Open the practice file (linked in the Resources section below) in your editor.
-
Set a breakpoint and run the file in debug mode.
-
Step through each concept — integers, floats, strings, lists, dictionaries, loops, and if–else — one at a time, and observe the output at every step.
-
Open the debug console and experiment freely. For example, try:
ltp + 10 ltp - 10 -
Modify the if–else conditions with your own numbers and watch how the output changes.
Spending even a single focused hour actively experimenting with these blocks — rather than passively reading about them — is what will make Python concepts genuinely click.
Getting Help
If you run into questions while practicing, you can post them on the Made For Trade community forum (see Resources). When asking for support, keep these two rules in mind:
Warning — Never Share Sensitive Credentials Never post your Client Code, PIN, or TOTP/API secret in a public forum, chat, or support ticket. Anyone with access to this information can place orders directly on your trading account — treat it with the same seriousness as your bank account details.
Tip — Formatting Your Code Correctly Always paste code using the forum’s dedicated code block feature rather than pasting it as plain text. Plain-text code loses all indentation and formatting, which makes it very difficult for anyone to read or help you debug. A properly formatted code block preserves structure, coloring, and indentation exactly as it appears in your editor.
What’s Next
This post covered the foundational Python concepts used throughout the Complete Algo Series. In the next part, these same building blocks — combined with the Dhan API — are used to construct an actual momentum scanner, followed by order placement, deployment, and finally options order execution.
Practice the concepts in this guide thoroughly before moving on — everything that follows builds directly on top of them.
Resources
- YouTube Video: Python for Algo Trading — Full Tutorial
- Practice Code Files (Google Drive): Download practice files